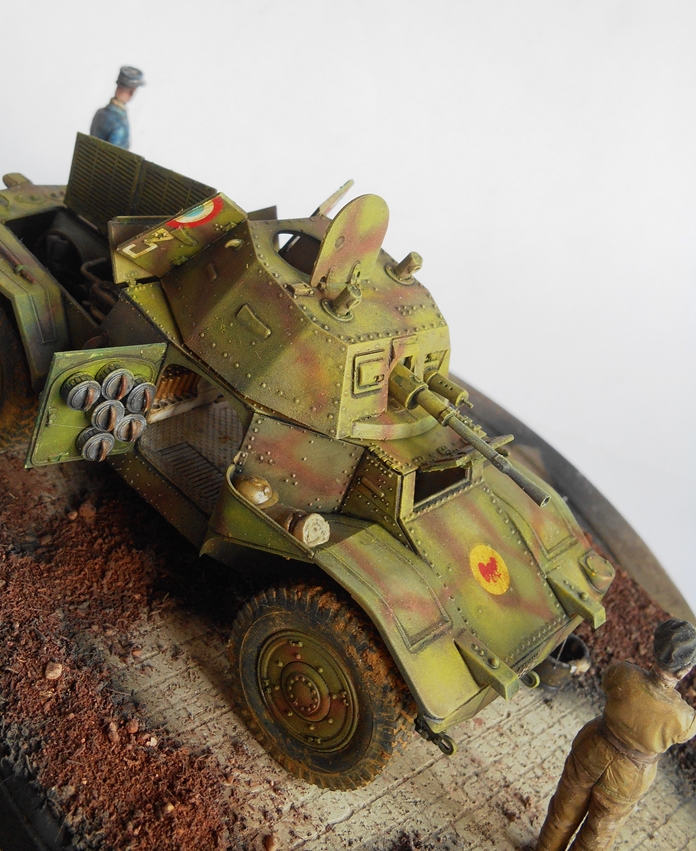
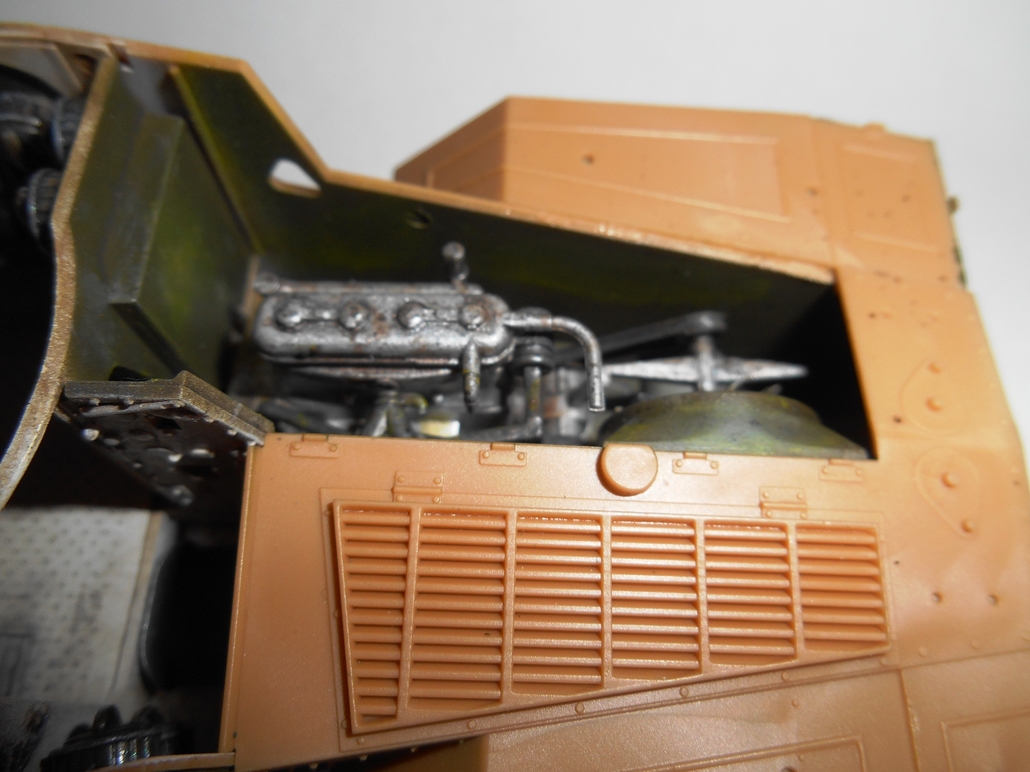
Il kit ICM si presenta con sprue di color ocra con una
plastica dì ottima qualità facile da lavorare, le stampate non sono eccessive e
il dettaglio è ottimo, anche gli interni se pur minimali sono sufficientemente
ben fatti per presentare il modello con tutti i portelloni aperti.
Le ruote in gomma sono ben fatte, il montaggio è semplice,
le istruzioni ottime e per concludere consiglio a tutti questo splendido kit
che è un puro divertimento.
Ispirandomi ad una foto ho voluto ricreare una scenetta
semplice che mettesse in risalto il mezzo.
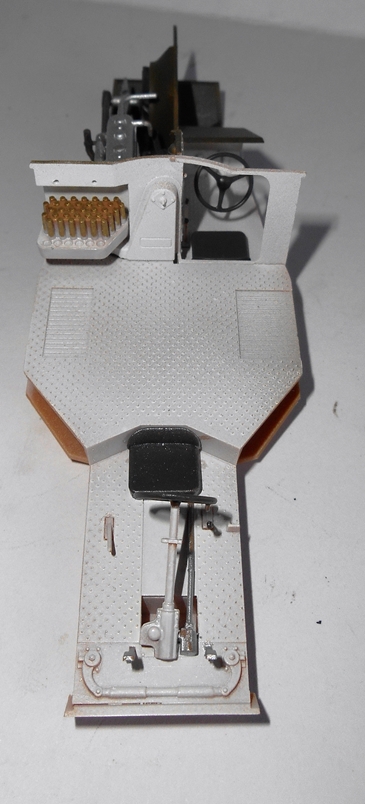
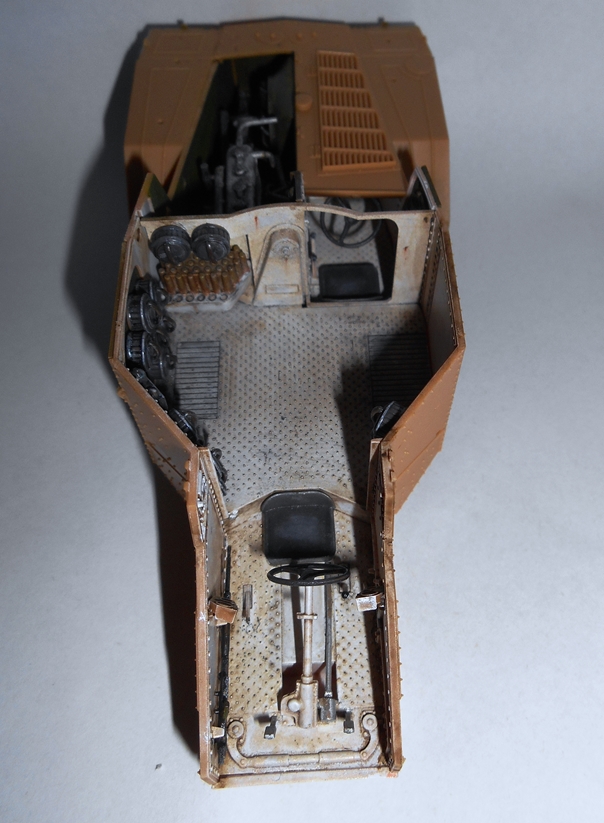
Naturalmente per
prima cosa si è montato gli interni dipingendoli con un bianco Humbrol , un
grigio verde e un verde panzer Vallejo Air; le munizioni della riservetta sono
state dipinte con un pennarello a vernice comprato al Lidl.
Con gli oli Maimeri e W&N si è ricreata usura e sporcizia degli interni,
assemblando poi il resto del kit e chiudendo tutti i portelloni con della colla
vinilica di modo da poterli riaprire in seguito.
Per prima cosa ad aerografo si è dato un terra scuro Vallejo
Air nella parte inferiore dello scafo a seguire utilizzando verde panzer, verde
pallido e giallo oliva Vallejo Air si è dipinto il resto del mezzo.
Per dare luce si è data una velatura di giallo Tamiya,
schiarendo i pannelli con del terra Vallejo Air e per richiamare le tonalità
verdi a concludere una velatura di azzurro Vallejo Air.
Il cannoncino e la mitragliatrice sono stati dipinti con un
gun metal Humbrol
Per riprodurre lo schema mimetico presente nelle istruzioni si è
mescolato rosso scarlatto(poche gocce) a
marrone panzer Vallejo Air.
Con oli Maimeri e W&N
si sono applicati dei filtri e una volta asciutti sono seguiti dei
lavaggi mirati con terra di kassel Maimeri; la mimetica è stata ripresa con un
magenta W&N e le luci date con
giallo Napoli e carnicino della stessa marca sia tramite dry brush che sfumando
il colore.
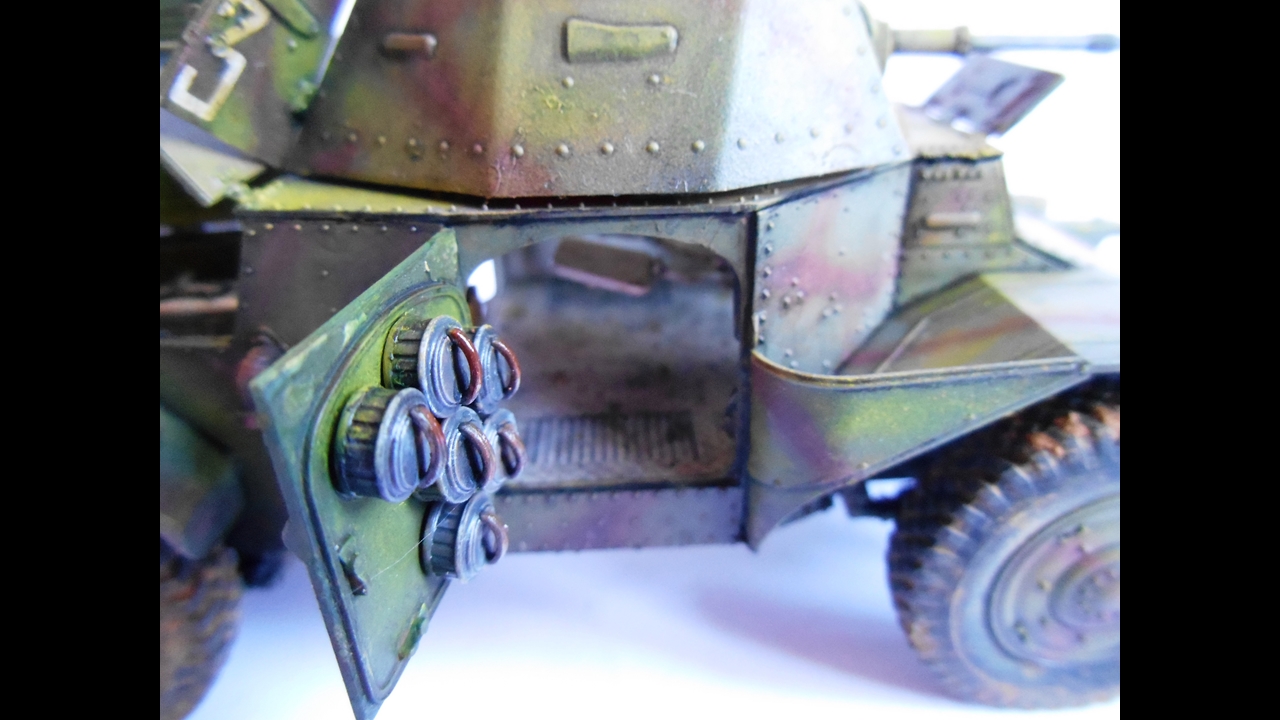
Per ricreare i depositi di terra sotto il mezzo si è
utilizzata la terra di un cactus morto mescolata con terre da colorificio ocra
e borotalco e applicandola con colla vinilica diluita in acqua.
Stesso procedimento hanno subito le ruote in gomma; per
finire si sono profilati i pannelli e le scanalature principali con del nero.
La basetta 15
cm scarsi per 21,5 cm è stata ricavata da un tagliere a cui si
è asportata l’impugnatura.
La pavimentazione è stata riprodotta partendo da una lastra
di plasticare da 1 mm
su cui a matita si è disegnata la pavimentazione.
Con il trapanino proxxon e una fresa si è inciso seguendo il
disegno e poi con un'altra fresa da 0,5 mm e della colla si è testurizzata la
pavimentazione.
Con della terra cotta si è ricreata la base del terreno ai
bordi della strada e una volta asciutta vi si è incollato della terra (sempre proveniente dal vasetto
del cactus) mescolata a terra da colorificio color ombra bruciata(il tutto
fissato con vinilica sia liquida che vaporizzata in diluzione al 70 %).
La pavimentazione stradale è stata dipinta con grigio
azzurro e il terreno con color terra
Vallejo Air, in seguito la pavimentazione ha subito un lavaggio ad olio ombra
naturale e il bordo del terreno uno terra di Kassel.
La pavimentazione ha poi ricevuto un dry brush carnicino e
il bordo del terreno è stato profilato con un nero ad aerografo.
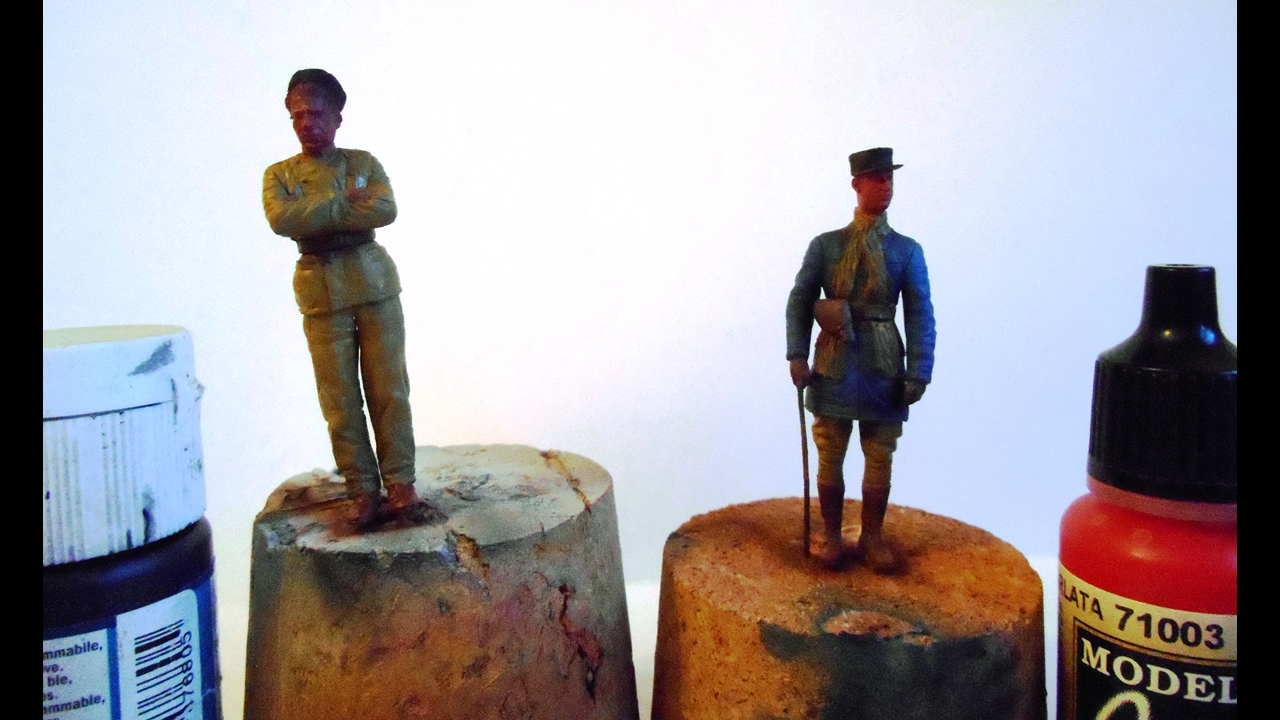
Fissato il mezzo con colla vinilica alla basetta sono
passato ai figurini, due carristi del kit MiniArt 35105, non sono eccelsi ma
vanno bene per lo scopo, all’ufficiale è stata
sostituito la testa con una Hornet.
Per dipingerli si sono usati colori di base dati ad
aerografo e finitura ad oli, purtroppo per me si è verificato un problema con
l’opacizzante che mi ha fatto impazzire cristallizzando su uno dei figurini.
Per gli impedimenta una catena da modellismo navale Amati, un telo e elmetto francese Tamiya mutuati dal
kit del Lorraine.
Un secchio Tamiya con straccio ricavato da fazzoletto di
carta imbevuto di vinilica e liquido riprodotto con acrilico nero Italeri e
Still water vallejo , insieme a una pedana/coperchio in legno auto costruita sono serviti a colmare gli spazi vuoti e a
rendere più equilibrata la scenetta.
The kit comes with a plastic of ocher color.
This icm high quality kit easy to work with not excessive parts and with a very good detail , even though minimal interiors are sufficiently well done to present the model with all the doors open .
The rubber wheels are well done, the assembly is simple, good instructions, and finally recommend to all this beautiful kit that is fun.
Of course
the first thing you mounted the interior painting them with a white Humbrol, a
teal and green panzer Vallejo Air; ammo box were painted with a marker to paint
bought at Lidl.
With oils Maimeri and W & N has created wear and dirt of the interior, then assembling the rest of the kit and by closing all doors with the glue so that they can be reopened later.
First at airbrush was given a dark ground Vallejo Air at the bottom of the hull to follow using panzer green, pale green and yellow olive Vallejo Air has painted the rest of the kit.
To give
light is given a yellow Tamiya, clearing the panels with the ground
Vallejo Air and to call green shades to conclude I give a blue Vallejo Air.
The cannon and the machine gun were painted with a gun metal Humbrol
To play the camouflage pattern present in the instructions blended scarlet red (a few drops) in brown panzer Vallejo Air.
With oil Maimeri and W & N have applied filters followed by targeted washes KASSEL Maimeri.
The camouflage was increased with a magenta W & N and the lights give with Naples yellow and flesh tone of the same brand and through dry brush that blend the color.
To re-create the deposits of earth under the Panhard I used the land of a dead cactus mixed with ocher pigment and talcum powder and apply it with glue diluted in water.
I did the same for the rubber wheels.
To finish it are profiled panels and main grooves with black.
The base 15 cm by 21.5 cm was obtained from a cutting board
The flooring was reproduced starting from a sheet of plasticard 1mm on which it was been drawn with pencil, the flooring.
With the drill Proxxon and a cutter, following the design i did the floor.
With the terra cotta has created the basis of the land bordering the road and once dry there is glued the earth (also coming from the jar of cactus) mixed with pigments burnt umber color (which is fixed with vinyl glue diluited with water at 70%).
The road surface was painted with blue and gray with earth tones Vallejo Air, after the pavement has been washed with oil paint natural shade.
The floor was then given a flesh tone dry brush and the edge of the land has been profiled with a black color give a airbrush.
the figurines, from the kit miniart 35105, , the officer head was replaced with a Hornet.
To paint them i have used acrylic for give basic colors at airbrush and finish with oils.
For the impedimenta i use a chain Amati, a towel and helmet borrowed from French Tamiya kit of Lorraine.
a bucket Tamiya with a cloth made from paper towel soaked in liquid vinyl and filled with black acrylic Italeri mixed with Vallejo Still water, along with a wooden platform served to fill the gaps and make it balanced the skit.


Nessun commento:
Posta un commento